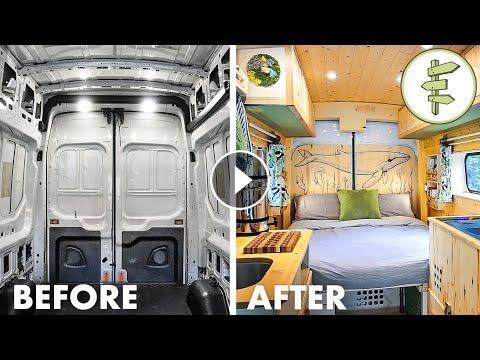
See our DIY camper van conversion from start to finish! We converted a used 2015 Ford Transit with a high roof and 148" wheelbase. We used all natural materials and non-toxic materials like hemp insulation, cork flooring, low VOC paint and varnish, and a lot more! We wanted our van to be as comfortable and functional as possible so there's a bed that transforms into a couch and dinette, a bathroom with a privacy wall, loads of accessible storage, and more! We hope you enjoy seeing behind the scenes of our off-grid tiny house on wheels being built. It was a lot of work! Please keep in mind that we're not professional builders and we experimented with this build quite a bit. Definitely do your own research before building your own van!
Video Script::
hey everyone in this video we're going to show you the whole build process of our campervan from start to finish well show you how we went from this to this and for each step we're going to share some important details considerations and lessons we learned our van is a used 2015 ford transit with a high roof and 148 inch long wheelbase our design has a super comfortable and multipurpose bed that transforms into a couch and dinette it has loads of storage overhead and under the bed a functional kitchen with a 12-volt fridge and simple plumbing some inset space-saving shelving and even a small bathroom with a privacy wall for electricity we have a solar generator that's powered with 200 watts of solar panels on a DIY roof rack and we also have an auxiliary battery that's powered with the vehicle alternator we used as many natural materials as we could including recycled cork insulation in the floor hemp insulation in the walls and ceiling and we used hemp oil beeswax and low V OC paints and varnishes for the finishes we put a ton of work into this van conversion but please keep in mind as you're watching this video that we're not professional camper van builders we were experimenting and trying a lot of new things as we were building and everything didn't always turn out perfectly so we'll try to point those out as we're going in the video this is a longer form video so we'll put shortcut links in the description if you quickly want to skip to different sections of the video so now let's start from the beginning to plan the conversion we do a simple floor plan and we also did several rough sketches for building the furniture our planning was actually pretty basic so we built and figured things out as we went along so the first thing we did after buying the van is to get our two windows installed we got two windows that open up and have screens after that we spent some time cleaning up the inside of the van sanding down and painting all the rough spots that were on the inside to start with a clean rust free surface the next step was to check for leaks on the inside of the van because we had heard that transits can have areas or water comes in even in new vans so that was a very important step so to check for Lee it was a multi-day process we had to wait until it was raining heavily and we also hosed down the van quite a bit to see if there was any water coming in from anywhere inside the van when it was raining we'd be in here with a flashlight checking every little inch of the roof and the side and everything and we're really happy we didn't skip this step because we did find three areas where water was coming in one of them was the top brake light in the back the seal around it it didn't seal properly so we had to caulk all around the brake light and that fixed that issue also all the pegs that hold the plastic cladding on the outside of the van those were not sealing properly and water was coming in through those two so we cocked all the pegs from the inside the last leak was a bit of a mystery it plagued us for a really long time it was coming from somewhere on the roof but we never quite figured out the source but water was pooling behind the driver's seat there was a plug that Ford had put there so we just removed the plug and then water was able to drain directly onto the ground so that completely fixed the problem we just had to make sure that insulation wasn't right up against the corner where the water was draining out after prepping the van the first thing we did was install our roof vent we did buy a custom flange that fit the Ford Transit roof and this made the installation of the roof vent a lot easier we decided to install a max air fan and we're really happy we did these fans can stay open even if it's raining which is great and also has ten different speeds there's an option for a model with a remote control which we thought was pretty silly at the time but it would actually be a nice luxury to be able to turn on the fan from the bed next we started working on the subfloor we started by creating a pattern of the van floor out of paper until we got it just right then we cut the shape out of three plywood sheets and attached them together with a biscuit joiner and wood glue before putting the plywood down we created a frame on the floor using cedar strips and we glued them down using PL Premium construction adhesive to insulate the floor we filled the frame with almost an inch recycled granulated cork the cedar stripped frame helped to hold the insulation and it also gave us something to screw the subfloor into while we were doing this Danielle's brother built two boxes to cover the wheel wells of the van after that we started framing the inside of the van using 1 by 3 inch studs for the walls and custom cuts strips of plywood for the ceiling studs because they could bend to the curve of the roof this was a pretty tricky step for us because we had to make sure there were studs in the right places to be able to install our tongue-in-groove paneling and furniture later on this is when we realized it would have been nice to have a more detailed drawing of our conversion to work with but with the van being such an odd shape it still would have been hard to plan for everything in advance we secured all the studs with some PL premium and self-tapping screws once this was all done Danielle also insulated and installed the boxes that cover the wheel wells next we built two frames for the windows and some inset shelving that would go on each side of the bed and one in the bathroom the inset shelving was quite a bit of extra work and planning upfront but it's really nice and practical to have him now the next step was to insulate the van to insulate the walls and ceiling of the van we decided to use natural hemp insulation we use a combination of two inch hemp insulation batts and thin hemp felt to cut the bats we needed to use a handsaw and we were able to cut the thinner stuff with scissors we did our best to cover every single metal surface of the van for some parts of the walls we used double-sided carpet tape which was really helpful to temporarily secure the felt insulation until the walls went up for the ceiling we used string to temporarily secure the two-inch bats in place insulating the van took quite a bit of time but it was nice working with hemp because it smells good and it's nice to work with something that's natural and non-toxic we also insulated the doors where possible and finished him with some quarter inch plywood so the insulation was probably the hardest thing to decide on we did a ton of research and we prioritized using a natural material even though we didn't know how it would perform in the van so we decided to use hemp insulation it comes in bats kind of like fiberglass insulation and what we liked about it is that you can use it without a mask without gloves it smells really good and it's non-toxic and you're supposed to be able to use it without a vapor barrier as long as you have a breathable wall structure so instead of painting or varnishing the walls or the ceiling we finished it with furniture grade hemp oil and that's supposed to keep the wood breathable and the idea is that if the insulation does get moist it should be able to breathe out through the walls and the ceiling and dry out so we live in the van about half the year and during the summer the warmer months it's not a problem but when it starts to get colder and the heat is on a lot more that's when condensation can start to happen especially because it's such a small space and it's a metal box so out of curiosity to check how the insulation was performing after spending a pretty extended period of time in the van when it was pretty cold outside we decided to remove some wall panels and this flashing here and we went checked the installation so it did seem to be performing well except that we did have a couple problem areas and those few problem areas seem to be where cold metal is exposed to warm air from inside the van but without good airflow so for example the metal around the door here and around the back of the door there's no problem there but up here we had put insulation between this foam part here and the roof of the van but there was an air gap between the insulation here leaning up against this this board and the roof of the van so condensation was forming on the roof and dripping down onto the insulation and there was no air flow there so it wasn't drying so we removed the insulation that's there we're gonna have to find another way to finish that area maybe with reflectix or spray foam or a combination and then another area where we seem to have a bit of a problem is around the windows the window frame does seem to have a bit of condensation on it when it's cold outside and the water might be dripping down so we're gonna have to finish that area a little bit better maybe some caulking maybe add a bit of spray foam around so overall the general areas seem to be fine but there's a few problem areas if we had to do it again I don't know I think I think we would maybe use hemp insulation again perhaps we would use a vapor barrier this time between the metal and the hemp but that would also make me a bit nervous that moisture could get trapped there and they would never dry out it doesn't seem like there's a perfect solution this is a really hard thing to insulate there's all sorts of grooves and cavities in the body of the van and it's really hard to go and fill in all those areas and you also don't necessarily want to encase you block a drain we've considered using spray foam and that's one of the reasons we didn't use it so insulating a van is definitely a challenge and there's not really a perfect solution there's pros and cons I think to every insulation option before finishing the walls and ceiling we ran the electrical wires for the lights and the fan through some plastic tubes from the ceiling down the solar generator on the ground we did this just in case we needed to replace something later down the road because we thought it might be easier to run a new wire in we're not sure if this would work though because the tubes are quite small and for power we're using the apex solar generator by energy and it's easy to plug everything directly into it now we were ready to finish the walls and ceiling with some natural pine tongue-in-groove paneling first we old all the boards with furniture-grade hemp oil which still allows the wood to be breathable it definitely took a while to custom cut every single piece to fit around the windows and shelving to install the boards we used a little bit of PL premium on each one and then used a nail gun to secure them before being able to do the sealing we had to finish some of the more challenging areas of the van for example at the back of the van here we wanted to cover up and insulate all the metal around the back door this was particularly challenging because we had to create these pretty intricate shapes that fit into each other to close up this area Danielle's dad helped us a lot with this super challenging task this front area above the driver's seat was also really hard to finish it took a while to create this custom piece that would fit in there and hold up the ceiling paneling as we were finishing the ceiling we also installed our LED lights onto the boards once the lights were in place we were able to finish the whole ceiling of the van while we were doing this Daniel's brother worked on building the front face of our overhead storage cabinets Danyelle actually designed and built the frames for the two kitchen cabinets and she really did a fantastic job we decided to use almost entirely 2x2 wood to frame all the furniture and the reason for choosing two by twos was to save on the final weight of the campervan the big challenge was building solid furniture with the smaller pieces of wood but we made it work and the result feels rock-solid so basically what we did is we built a shell we finished the walls the ceiling and the floor and then we were ready to move on to the furniture building stage and to really maximize living space and hallway space in the van what we did is that we built the furniture according to what we were gonna use it for and what we were going to put in it so for example on the driver's side we built a piece of furniture that holds the fridge our pots and pans and the solar generator and what we did is that we bought the fridge and we got the solar generator ahead of time and we built the piece of furniture around those pieces more specifically around the fridge so it's really snug in there and on the passenger side we built the kitchen cabinets specifically around the gray and fresh water jugs and what was great about doing this is that we were able to really maximize the hallway space and the living space and make it more comfortable but there is a drawback is that if ever we need to switch the fridge if ever it doesn't work anymore maybe it's five years down the road and they no longer make this particular fridge maybe we won't be able to find something that fits in that box same thing goes for the water containers so that might be a bit of a risk in the long run but for now we're really happy to have these pieces of furniture that really maximize living space for the cabinet that would hold the sink we had to create a subfloor to fit the plumbing and I'll explain that a bit later we installed our foot pump and the tubing and we threw in some extra cork insulation in the cavity because we had some left over after all the framing was done for the furniture we added half inch plywood pieces to close the mitten and we finished everything with hemp oil after that we cut out the opening for the sink and mounted it to the countertop we also made a custom faucet out of a copper pipe that we cut and soldered together the kitchen sink cabinet took quite a bit of thought in planning because we wanted to make sure we could fit our two water jugs and the gray water tank without the cabinet being too wide and taking too much space in the van we also made a door that we could access from the outside of the van to be able to take the fresh water jugs in and out easily we used a really simple marine foot pump that takes fresh water from the fresh water jugs brings it up to the faucet and then it just drains into the 5-gallon bucket at the bottom of the bucket we installed a standard hose bib and we actually drilled a hole through the floor of the van and ran a quick-connect hose to be able to drain our grey water and that's why we raised the cabinet a bit so that we could have room to connect and disconnect the hose and also to have some toe-kick space we're really happy with our plumbing system because it doesn't require any power it's completely silent it was pretty simple to put together and since we're using a foot pump we don't go through fresh water as fast as we would with a 12-volt pump if you want to know more about our plumbing system we made a full video about it and the link is in the description one thing we would change is we would add a p-trap to prevent odors from coming up from the gray water tank next we started building the bathroom we basically built a closet to hold the toilet and the door opens to create a privacy wall with very limited space this was the best way we could think of to fit in the toilet with a bit of privacy so we installed a very basic dry toilet we're using a separate urine diversion attachment under the seat with a stainless steel bucket and sawdust for solids and four liter jugs for liquids and we even installed a 12-volt fan that exhausts directly from the inside of the toilet to the outside of the band to do this I just installed a computer fan plugged into the auxiliary battery under the driver's seat with a switch and we cut out a hole on the side of the van and installed a small louver there's a pipe going from the fan to the outside of the van if you want more detail about our toilet you can check out our full van tour which is linked below in the description probably the most complicated thing about building the toilet was creating some solid walls out of two by twos and scribing some really custom shapes out of plywood to follow the line of the van wall inside the bathroom everything was varnished with low v oc'v our niche because we wanted to be able to wipe down all the surfaces the hemp oil is great but the wood is still porous so it's harder to clean so for something like a toilet we thought it was definitely better to use varnish okay so here we decided to build our own roof rack that would hold the solar panels the reason for this is that we didn't want to drill holes directly in the roof of the van for the solar panels and the ford transit vans come with pre threaded holes that can hold a roof rack that Ford makes and those roof racks are kind of expensive so I decided to build my own using some 1 by 1 inch aluminum metal tubing that you just find at the hardware store for pretty cheap so that worked it's very solid I'm happy with how it ended up but it was a ton of work it was actually really really hard to do to cut these metal pieces and just make them fit perfectly onto the pre threaded holes that the roof already had it was just a ton of work and really hard to do so if I had to do that again I would probably buy the Ford roof rack and just modify it we installed two 100 watt solar panels and ran the cables through a hole drilled in the roof of the van and as you can see here I had to create a small piece to seal the opening and hold the wires I had to get a bit creative here with random pieces found at the hardware store and a lot of caulking to make sure it didn't leak next we started building the bed and dinette area here we really took our time to plan and create a multifunctional space that would act as a dinette area a lounging space and a bed with plenty of accessible storage we first built a frame out of two by threes and put some strengthening supports in the middle [Applause] we then finished the top with some 1 by 4 slats that also formed 2 hinged panels for the front and back of the bed the one at the back creates a backrest if we want to sit up in bed and the one at the foot of the bed is used to access storage under the bed from inside the van and the reason why we chose to finish the entire top of the bed frame with wood slats instead of a full piece of plywood is to make sure that there's always some ventilation under the mattress at the foot of the bed frame we built these two seats with some storage underneath and a small step in the middle to be able to put our feet up and also fit more storage we then attached all the pieces together and secured them to the floor and the walls for the adjustable backrest we came up with an idea to run some rope through a copper pipe attached to the backrest running the rope through the copper pipe distributes the weight so that the backrest doesn't break so we can pull it up and secure it to boat cleats that are on the side of the bed so far it's been holding out very well but we're careful with it we also built a small swivel table that serves two purposes it's a table but it also slides onto these little rails to complete the foot of the bed the table has a really simple construction there's a flange at the bottom that screws into the leg that's made it using galvanized pipes and elbows and it just slides into a slightly bigger pipe that attaches to the foot of the bed that way the table can rotate in several different positions depending on what we need the idea behind the bed and dinette design is that we wanted to create something that was comfortable and that could be transformed without too much work [Music] after finishing the bed we installed the overhead storage we added a plywood bottom to the face that was already built and attached it to the ceiling and walls it didn't feel secure enough with only a few anchor points where the face of the storage touches the roof rafters so we added an L bracket in one spot and attached the ends to other supports looking back we wouldn't use cedar for this because the wood is just too soft we then put up all the cabinet doors and Danielle came up with an ingenious low-tech way to prop them up she just cut some metal wire and created a little arm similar to what you see holding the hood of a car the arm simply rotates through a little block of wood comes down into the corner to hold the door and then it folds back up and attaches to a small magnet on the door you'll also see that we simply cut out holes for handles we thought this was a nice and easy way to create handles without using any hardware and it also allows for ventilation in the overhead cabinets we also cut out holes in various areas throughout the van for the same purpose we think it's really important to have good airflow throughout a small space like this to prevent moisture and mold issues one of the last steps was to finish the floor with cork tiles we cut them all out to fit around the furniture and glued them down using low vo C contact cement we chose cork because it's natural and it added another small layer of insulation where we stand but we did still have to varnish it after it was installed so it's not a completely natural option once the floor was done we put in some finishing touches like a small spice rack a little shelf to hold our cutting boards and oils and another shelf up top to hold our speaker and devices we also added two more reading lights at the back of the van and I finished the side and back doors with some paintings [Music] we installed blackout curtains at the front of the van for privacy and we built a double curtain rod for the side windows one has blackout curtains and the second one has a lighter fabric that lets light through so this gives us two different options Danielle's mom did all the sewing for the curtains and the cushion covers which was super helpful one of the last steps was getting our Abasto heater installed by a professional and this just runs off the gas tank of the van we also installed a smoke and a carbon monoxide detector so that is the whole build process from start to finish if you want to see the final tour of the camper van you can click the card right there I'll also put a link in the description below and I'll also include some links to some of the products we use if you want to check those out thanks so much for watching we'll see you in the next video
- Category
- Variety
- Tags
- van, life, van life, van tour, DIY, camper, conversion, build, how to, full, tour, start, finish, before, after, Exploring, Ford, Transit, High Roof, Alternatives, building, converting, natural, non-toxic, hemp, cork, insulation, roof vent, kitchen, bed, transforming, materials, timelapse, bathroom, toilet, plumbing, floor, windows, wall, ceiling, solar, panels, electrical, battery, generator, heat, curtains, dinette, couch, swivel, table, adjustable, furniture, comfortable, office, work, wood, oil, overhead, storage, tiny house, off grid

-
15:06
-
10:35

-
10:53

-
08:45

-
02:05
-
01:02
-
10:30

-
05:54
-
08:05

-
08:01
-
04:35

-
04:09

-
08:22
-
07:16

-
03:59

-
03:49

-
1:59:29

-
11:32

-
03:20

-
41:21
-
04:35

-
07:03