
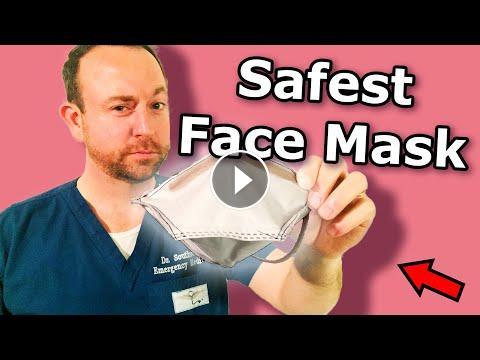
A doctor explains how to make the safest face mask. This is a safe face mask that if built properly should be donated to your local emergency services. It utilizes a HEPA filter, which is much, much better than a cotton mask.
Directions for making masks: https://drive.google.com/file/d/1fW_Qrv_1J26Lgd1kawSWqqyKvbYOY2Fu/view
Mask patterns: https://drive.google.com/file/d/1gaiM3yZLalU1_7mlMeLR-3967A8cEu5H/view
Websites cited:
https://www.cdc.gov/coronavirus/2019-ncov/hcp/respirators-strategy/crisis-alternate-strategies.html
https://www.cdc.gov/coronavirus/2019-ncov/hcp/ppe-strategy/face-masks.html
https://www.osha.gov/video/respiratory_protection/resptypes_transcript.html
remember: Social distancing works, wash your hands, support the frontline.
Video Script::
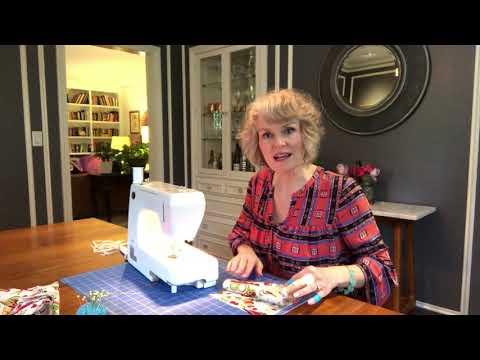
by the end of this video you will know how to make a facemask what materials to use and why and even how by making these at home you can help save lives I'm dr. Ryan Southworth board-certified emergency medicine physician and emergency medical services medical director many of you has started making homemade cotton masks in case our masks run out and we are out on the front line are very grateful for your support however Hospital's emergency rooms and medical staff are already on very short supply and this virus hasn't even hit all our communities yet plus as nice as cotton is it just isn't designed to be a filter the virus can still get through the tiny holes in the fabric I believe that this is the best mask you can make it home and donate to your emergency medical services in your area why is that it's mainly in the material a standard HEPA filter vacuum bag this is an OSHA certified material that filters out 99.97% of airborne particulate matter per osha standards I'm confident that this mask will save lives now as a physician I have to give you a disclaimer because this hasn't gone through rigorous testing but I'm very impressed with the clinical results I wore this mask around the house for a prolonged period of time and even cooked bacon to see if I could clearly smell it I could not so this seems to confirm to me that both the material and the seal work is intended it's also worth noting that any mask is better than no mask in fact the CDC recommends in their current publication that quote it may be considered to use these homemade masks for the care of patients with kovat 19 but I think that this specific material in design is the best that we can do at home in 95 masks must seal to the face tightly to work the duckbill style is particularly popular and with a sewing machine some scissors and elastic with a standard HEPA filter vacuum bag my wife figured out how you can create a mask that can save lives she is my hero for figuring out how to make these and if it wasn't for her I couldn't serve you and your family she does her best to keep me safe so I can do my best to help you now here's the hero who figured out how to actually make these my wife Amy Southworth wait and please before you proceed with the video ensure that no one in your home is currently showing any symptoms or has been diagnosed with kovat 19 before starting this project please wash your hands thoroughly with soap and water also be sure to use the first mask you make as both a test of quality and to ensure that you do not breathe on any of the other masks you produce transport these in a clean and safe state thank you hey guys today we're gonna make a mask so we're gonna show you the supplies that you need to make it first you need these HEPA bags these are just from vacuums the bags you would use the important thing is is HEPA because it traps 99.9% of dust and pollen so you you're getting that protection you need for these masks versus like a cotton mask you also need a glue gun with a glue stick a pipe cleaner a pencil elastic thread for your sewing machine scissors and a template in this template you can find and you can download it yourself the first thing you're going to do is you're going to take your elastic and you're gonna make it the length of this piece of paper which should be 11 inches so you just go from one end until the other and then you're going to take your scissors and you're going to just snip it off that's the length you need for this mass the second step is that you're going to take that elastic and you're going to cut it in half lengthwise if you have around the house this size elastic you can just cut off two of those whatever you have at home please do not go out to your store and buy this the next part is you're going to want to cut out your template this is the template for a regular size mask we're also going to have a template for a small side so all you're going to do is you're going to cut out the template along this black line and I know some of you are cringing because I'm using my fabric scissors so here's the bag when you open it up you're gonna actually get two bags if with each a vacuum bag you should be able to make four masks first we need to expand these sides so we're going to very carefully cut to bring those sides out and you're gonna have to do it to all four spots and you really want to do this carefully so you don't mess up so you want to kind of scrunch it and then just make us incision so you just cut it and just cut along the side if you are sick do not make these for people or if you think you have been exposed you do not want to make these so once you have both sides you kind of go in with your finger because it's connected right here and then you just put your scissors there and snip it and so that's going to bring out your side like so and so you want to do that with each and [Music] so now your bag should be able to lay it flat the next step is you want to take I'll flip it just so you have a clean thing you're going to take your pattern and you actually want to line it on this edge because you want that feeling to keep your mask sealed as you can see on this one we kept it so you're just gonna line it up now we're not using pins because we don't want to make any holes along here just to keep it as safe as possible normally we pin patterns but this time we are not because we don't want those little punctures in the mask here's the first one traced I already pre traced one for you to see I did it in pink just so you could see it and you can see they're pretty close together so you have to be careful when you do the patterns but you can see it makes one two three and then for and what you could do also if you want regular and small you could do the two regulars on the shorter ends and you can do the smaller ones here after you have them all traced you're going to cut the masks out you want to try to keep it as flat as you get as you can again I'm not going to pin it because I don't want puncture marks in this so here's one there's an extra layer of plastic that gets put in these to make the bag sturdy in the vacuum that actually does not have anything to do with the filter but we don't want that part for the ones that are going to have it so you're going to want to cut that part out so this one see how it has that extra piece of plastic you're going to want to just cut that out and you do have to be careful when you cut the sides because I accidentally cut this and you can see that it didn't go all the way through but I mean it's not as good so you that's why when you're doing the initial cutting you have to make sure you only have the one layer [Music] so now we have our for math the next step is for the front part of the masks to be able to have some kind of metal so you can pinch it around your nose we're gonna insert a pipe cleaner so all you're gonna do is you're gonna take a pipe cleaner and fold it in half like so there's different layers to this so you're just going to take top layer you're gonna see a piece of plastic and then you have the top layer you're going to want to place it about here because you want to make sure you have room to sew it shut hot guns you have to be careful because if it's too hot you're gonna burn through that plastic and then it's gonna be no good so I'm going to glue it you know wait a little bit Center it press down so you don't and then you can also like take it and just press down like so just double check it to make sure you didn't go through the fabric this one for some reason and make sure it still stays even with the rest of the mask so your mask is gonna look like this once you have that step done you're gonna flip your mask over and then on your sewing you're gonna put this out here and you're gonna sew where my finger is right along here and you're gonna do that to the other side as well remember this is a little bit longer so you want it longer the two sides of elastic flush with the pattern and then you're going to sew on each side and then you're also going to do the same thing to the other side of the mask we just want to make sure we sew this elastic in well enough that it's going to hold its shape so we're going to move over to the sewing machine and sew it okay the next step is we're going to sew along here and also along here I am purposely not using needles because I don't want to puncture the mask I'm going to line up the fabric to the edge right here of my foot and I'm just as much as I can and I'm gonna sew nose thing if you need to stop to reposition your fabric that's fine because you're probably going to have to because you don't have your little needles to help you up so once I have the two sides sewn and I did it in a color just so you can see it I'm gonna flip it over you're gonna put your elastic along the edge and then the other one I'm gonna flush to the two corners but you want it a little forward and you can tell about there and you're just going to sew along here and then on the other side you're gonna sew along here and you're also going to do that to the other end of the mask I really want to not puncture in the mask [Music] so I have one side now I'm going to do the other side so now you have all these parts together you're gonna refold your mask and then all I'm going to do is I'm going to sew along this edge right here and then I'm going to flip it and then sew a little bit closer on the inside [Music] [Music] then if you wanted to you can press the button you have it to close it on the end and then if you just trim off all your extra threads and then that's it you have your mask if you are making this for someone else do not try it on to make sure it fits because then you throw all of that cleanliness out the window and it goes on the person and once they put it on the part with this goes along the bridge of their nose and they can move it so it's secure that there you have your mask and you have two pieces of elastic to cover your head properly if you are a healthcare worker the CDC says that homemade masks can be used as a last resort but with a few days worth of masks and countries like China not able to keep up with demand I'm afraid we could go down the same route and if we have a last resort why not HEPA filter so based on very much non scientific study done at my home I would much rather have one of these than a cotton mask so if you can sew a cotton mask and have some extra HEPA vacuum bags even one mask will help save lives I believe thank you for supporting the frontline in the crisis please please please share this video with everyone social distancing works like and subscribe so you can follow along with me as this unfolds and if I get infected I'll let you know firsthand how it is again the most important thing is to share this video with everyone you know so we can reach everyone and get the support we need on the frontlines thank you
- Category
- Variety

-
10:42

-
02:09

-
02:58

-
10:31

-
01:16

-
01:03

-
03:05

-
03:21

-
08:05

-
08:01
-
04:35

-
04:09

-
08:22
-
07:16

-
03:59

-
03:49

-
1:59:29

-
03:23
-
03:51

-
04:24
-
03:21

-
08:30
Great thank you. It would be of great help if you showed how one fits when in use...just confirms how it would be used and seals.